The Cinematic Look
If you’ve ever scrolled through Instagram or YouTube, you’ve likely felt the sting of “Gear Acquisition Syndrome“—that nagging belief that your footage looks amateur simply because you haven’t dropped $2,000 on a G-Master or Cinema Prime lens. It is the most common myth in filmmaking: that cinematic look is a product you buy, rather than a look you craft.
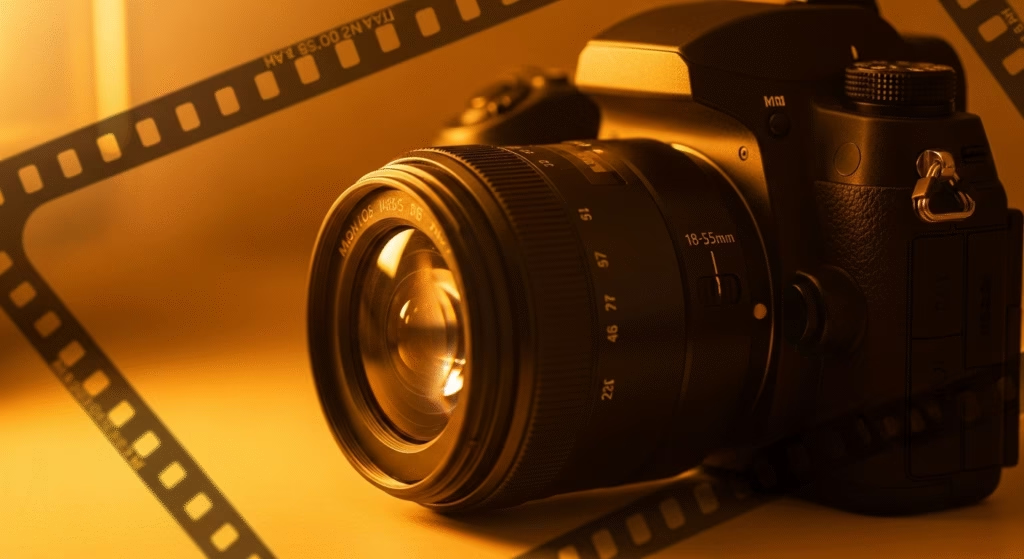
The truth is, the humble 18-55mm kit lens sitting in your camera bag is capable of producing breathtaking, movie-quality results if you know how to manipulate it. While expensive glass certainly helps with low light and sharpness, it does not compose the frame or light the scene for you. In fact, many Hollywood masterpieces are shot at apertures of f/4 or f/5.6—specs your cheap lens can easily hit.
This guide will break down exactly how to fake a ‘cinematic look’ with cheap kit lenses, proving that understanding the physics of your camera is far more valuable than maxing out your credit card on new gear.
The “Holy Trinity” of Cinematic Video Settings
Before you even point your camera at a subject, you need to strip away the “home video” aesthetic that modern digital cameras default to. To do this, you must master specific cinematic video settings for beginners that apply regardless of the lens you are using.
First, set your Frame Rate to 24fps (frames per second). This is the global standard for cinema and provides the specific motion cadence we associate with movies.
Next, you must adhere to the 180-Degree Shutter Rule. This rule states that your shutter speed should be double your frame rate. If you shoot at 24fps, your shutter speed must be locked at 1/50th of a second. This creates natural motion blur; if your shutter is too fast, the footage will look jittery and hyper-realistic (often called the “Soap Opera Effect”).
Finally, keep your ISO as low as possible (usually 100–800). Kit lenses often struggle with contrast, and high ISO noise will only make your footage look “cheaper.” By locking these settings in, you immediately elevate the perceived quality of your footage.
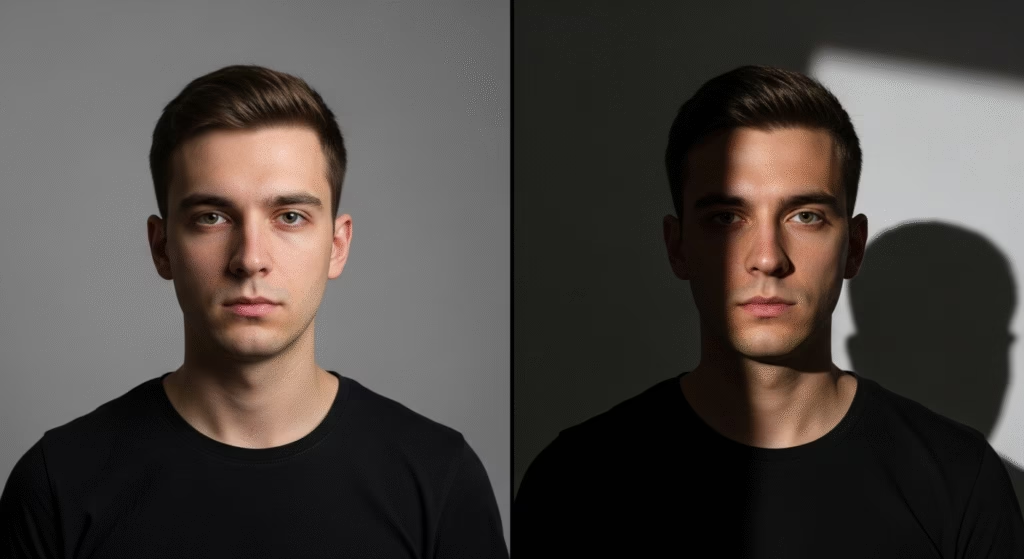
Lighting: The 90% Rule
You might be worried that your kit lens has a “slow” aperture (usually f/3.5 to f/5.6), meaning it doesn’t let in much light. However, this is where cinematic lighting techniques on a budget come into play.
Data from blind visual tests suggests that audiences frequently rate scenes shot on cheap cameras with professional lighting higher than scenes shot on $50,000 cinema cameras with poor lighting. It is estimated that lighting accounts for 90% of the perceived quality of an image.
Your kit lens might look flat if you shoot with the light source directly behind you. To fix this, use “off-axis” lighting. Position your subject so the light hits the side of their face (side lighting) or from slightly behind them (backlighting). This creates shadows and “contrast,” which generates the illusion of three-dimensional depth. By shaping the light yourself, you compensate for the optical flatness often associated with cheaper glass.
Drove by powerful LED chips-efficiency up to 93%
Hacking Depth of Field (The “Blur” Problem)
The number one question beginners ask is: “How do I get a blurry background without an f/1.8 prime lens?” This is the hardest thing to fake, but it is entirely possible if you understand compression.
Creating background blur with a kit lens requires you to stop thinking about aperture and start thinking about focal length and distance. Since your kit lens likely stops down to f/5.6 when you zoom in, you can’t rely on the aperture for that creamy “bokeh.” Instead, use the “Compression Method”:
- Zoom In: Twist your lens all the way to 55mm (telephoto).
- Get Close: Physically move your camera as close to your subject as the focus allows.
- Create Separation: Move your subject as far away from the background as possible.
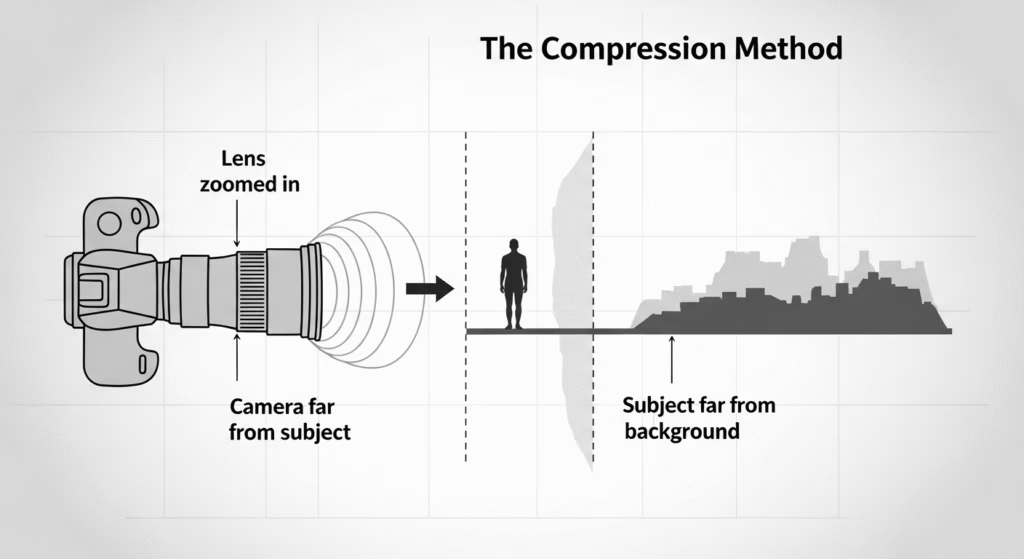
By using the long end of the lens (55mm) rather than the wide end (18mm), you compress the background, making it appear closer and softer. If you shoot wide at 18mm, everything looks in focus (the “iPhone look”). By zooming in and managing your distances, you force a shallow depth of field that mimics a much more expensive lens.
Hiding Imperfections with Composition
Finally, you can “fake” a higher production value by how you frame your shots. Cheap lenses often suffer from softness around the edges of the frame or lack of character. You can hide this by using “Dirty Framing.”
Place an out-of-focus object in the immediate foreground of your shot—like a doorframe, a tree branch, or a shoulder. This foreground element adds a layer of depth that distracts the viewer’s eye from the lens’s technical limitations. Furthermore, because the object is so close to the lens, it will be blurry even at f/5.6, creating a sense of depth and professionalism that “clean” shots often lack.
Additionally, if you are shooting handheld, the lightweight nature of 18-55mm lens filmmaking can lead to micro-jitters. Pull your camera strap tight against the back of your neck to create tension points, effectively turning your body into a tripod.
Conclusion
You do not need to wait for a gear upgrade to start telling visual stories. By locking in the correct shutter speed, mastering the art of lighting contrast, and using focal length compression to your advantage, you can produce stunning results right now.
The cinematic look is a language, not a purchase. Now that you know how to fake a ‘cinematic look’ with cheap kit lenses, the only thing left to do is go out and shoot. Grab your camera, set it to 24fps, find some good light, and hit record.