Table of Contents
- Why a Camera Under $500 Can Work for Your Home Studio
- Top Cameras Under $500 for Food & Product Photography
- Choosing the Right Lens & Accessories for Your Studio
- Lighting & Studio Setup on a Budget
- Shooting Techniques & Composition Tips
- Buying Used or Refurbished — Making Your Budget Stretch
- Editing Workflow Without Breaking the Bank
- A Real-World Case Study
- Challenges to Know & How to Overcome Them
- How to Scale Your Studio Over Time
- Marketing Your Studio Shots
- Key Takeaways
- Conclusion
- FAQs
If you’re building a home photography studio to capture mouthwatering food shots or crisp product images for your small business — but you only have around $500 to spend — you’re in the right place. You don’t need a high-end, thousands-dollars DSLR to produce professional-looking photos. With the right camera, smart lighting, and thoughtful technique, you can create studio-level shots that impress and convert. In this article, we’ll walk through the best camera for home product photography under $500, lens and lighting recommendations, shooting techniques, editing workflow, and how to grow your studio as your business takes off.
Why a Camera Under $500 Can Work for Your Home Studio
Many people assume that professional-quality photography requires expensive gear. That’s not always true — especially for food photography or product shots, where control over lighting and composition matters more than having the most advanced camera body.
- Controlled Lighting Equals Better Results
When you’re shooting indoors, you control the light. That means you can keep ISO low (reducing noise), set up consistent lighting, and minimize variables. A modest sensor or less advanced autofocus system can still perform very well under these conditions. - Budget-Friendly, Scalable Setup
Investing in a camera under $500 leaves room in your budget for other essentials: lenses, lighting panels, tripods, and reflectors. As your business grows, you can upgrade piece-by-piece — first adding better lenses or lighting before replacing the camera body. - Smart Trade-offs, Not Sacrifices
- Myth: “ business grows, you can upgrade piece-by-piece — first adding better lenses or lighting before replacing the camera body.
- Smart Trade-offs, Not Sacrifices
- Myth: “You get what you pay for” means low-cost equals low quality.
Reality: Many sub-$500 cameras offer APS-C or Micro Four Thirds sensors, which are perfectly capable of producing clean, detailed photos in controlled settings. - Myth: “Cheap cameras lack lens options.”
Reality: There are many affordable used or third-party lenses — prime, macro, or zoom — that pair well with budget bodies. - Myth: “Used or refurbished gear is risky.”
Reality: Buying from reputable sellers or secondhand camera stores mitigates much of the risk, especially if you check condition, shutter count, and return policy.
- Myth: “You get what you pay for” means low-cost equals low quality.
Unique Insight: For creators aged 18–34 — side hustlers, small business owners, content creators — the biggest value isn’t necessarily in an expensive camera. Rather, it’s in creativity, consistency, and learning. Investing in a modest, capable camera allows you to focus on what truly matters: your vision.
Top Cameras Under $500 for Food & Product Photography
Here are some of the most practical and powerful options for home product photography when keeping your camera spend under $500:
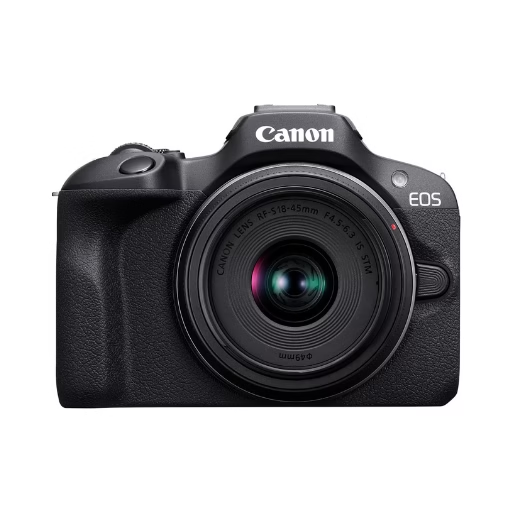
Stellar Image Quality: Canon EOS R100 4K digital camera with 24.1 megapixel CMOS (APS-C) sensor for superb image clarity and detail can capture images with natural bokeh
Canon EOS R100
- A mirrorless APS-C body that is occasionally available near or just under $500 (especially refurbished).
- Features a 24MP sensor and Dual Pixel autofocus, which helps with sharpness and focusing on product detail or food texture.
- While the LCD is fixed, in a studio you often don’t need a flip screen.
- Compatible with RF-S lenses or, with an adapter, older Canon EF / EF-S lenses — both of which can be found affordably used.
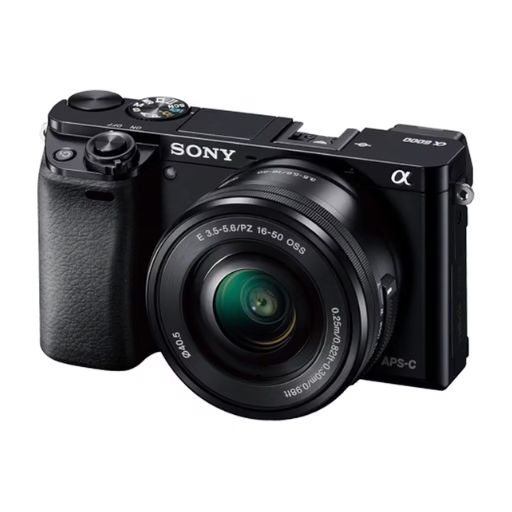
The 24-megapixel APS-C CMOS sensor delivers high-resolution images, even in challenging lighting conditions thanks to its ISO range of 100-25600 (expandable to 51200)
Sony Alpha a6000 (Used)
- A go-to for many budget creators: used listings often fall around or under the $500 mark.
- Features: 24.3MP APS-C sensor, fast autofocus, compact body.
- Huge support for E-mount lenses — including inexpensive prime lenses and macro options — letting you get very detail-oriented shots.
- Downside: no in-body image stabilization, so a tripod is highly recommended when shooting still-life or close-up objects.
Boasting a 16MP Micro Four Thirds sensor for sharp images and 4K video, this camera features unique 4K photo modes and intuitive controls with customizable dials for easy on-the-fly adjustments.
Panasonic Lumix G7
- A Micro Four Thirds mirrorless camera that, when used or refurbished, can come close to your target budget.
- Advantages: 4K video, articulating (flip) touchscreen — useful for creative flat-lays or odd angles.
- The MFT lens ecosystem is mature and affordable, with many third-party macro and prime lenses suited to product photography.
- Micro Four Thirds sensor is slightly smaller than APS-C, but lighting control in a studio minimizes disadvantages.
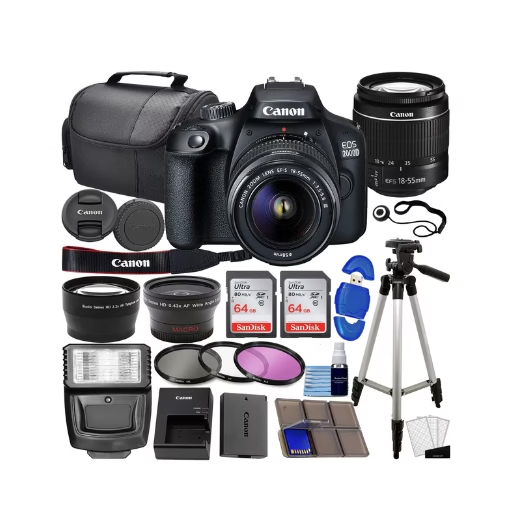
Deluxe Bundle with: Camera, 18-55mm Lens, Wide-angle and Telephoto, 128gb, Case, Filter Kit, Flash, Tripod and More
Canon Rebel T7 / 2000D
- A very accessible DSLR option.
- 24MP APS-C sensor gives solid resolution for product catalogs or styled food shots.
- Uses Canon EF / EF-S mount — plenty of used lenses available, including affordable primes, macros, and zooms.
- Pros: lots of glass choice, reliable image quality. Cons: fixed LCD, no 4K video, but for stills it’s often enough.
Budget Compact or Bridge Camera (Bonus Option)
- If interchangeable-lens setups are too difficult or expensive, consider a compact or bridge model under $500.
- These won’t give as much control over depth of field but can be very workable for simple flat-lay food shots or product catalog images.
- Ideal for creators prioritizing portability and simplicity, especially when budgets are tight.
Choosing the Right Lens & Accessories for Your Studio
Getting a great lens and a few key accessories can make a huge difference — often more so than upgrading the camera body itself.
The Impact of Lenses Over Camera Bodies
- Lenses determine sharpness, edge clarity, and depth-of-field control, all of which are critical for product or food photography.
- Even a budget body paired with a quality prime or macro lens can outperform a weak kit zoom in a studio setup.
Affordable Macro & Prime Lenses
- Macro lenses are perfect for close-ups: jewelry, food textures, or mini products. You can often find used or third-party macro lenses for Canon EF, Sony E, or MFT mounts.
- Prime lenses (e.g. 50mm f/1.8) are ideal for their speed, low-light performance, and beautiful background blur. They’re inexpensive and easily sourced on the used market.
Zoom vs Prime for Product Photography
- Zoom lenses are more flexible; you can change framing without repositioning your subject. Good for general-purpose work.
- Prime lenses typically give sharper results and better low-light performance. In a stable, well-lit studio, a prime is often the better bet for detail and consistency.
Essential Accessories
- Tripod + Remote Shutter: For sharp images and precise framing, especially in still-life setups.
- Memory Cards: Use reliable, fast SD cards — this helps when shooting bursts or large RAW files.
- Cleaning Kit: Useful to keep your lens and sensor spotless — dust or fingerprints can ruin product detail.
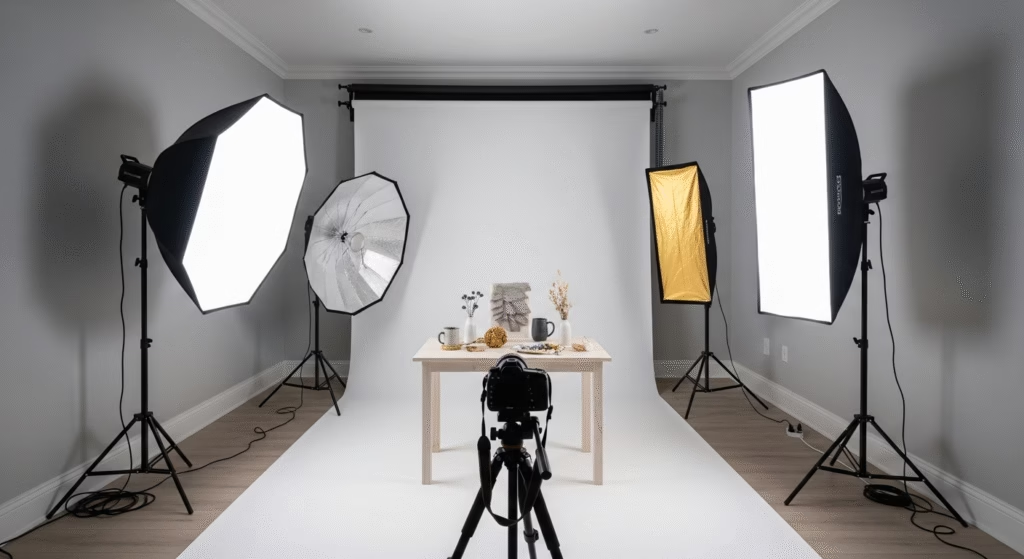
Lighting & Studio Setup on a Budget
One of the most important aspects of producing high-quality studio photos isn’t the camera — it’s your lighting setup.
Continuous LED Lighting vs Flash
- Continuous LED lights are beginner-friendly. You can immediately see how light and shadows look, making adjustment easier.
- Flash (strobe) gives more power, but requires triggering gear and more experience. For a $500-based setup, continuous LED is likely the smarter, more useful choice.
DIY Backdrops and Reflectors
- Use foam boards or poster boards (white, black, or grey) as simple, affordable backdrops.
- Use household materials (like white foam boards or even baking paper) as reflectors to soften shadows.
- Clamp or prop these surfaces using inexpensive stands, clamps, or even household items — you don’t need pro gear.
How to Place Your Lights
- Flat-lay / overhead food shots: Position two LED panels on opposite sides, angled in, with a reflector underneath or on the side to bounce fill light.
- Product shots (3D items): Use a three-point lighting setup — key light, fill light, and a back or rim light — to give depth and separation between the product and background.
Shooting Techniques & Composition Tips
Great photography isn’t just about gear — how you shoot shapes your final output.
Composition for Food Flat-Lays
- Style your scene: use props like plates, linen napkins, utensils, fresh ingredients, and textures to build a clean, cohesive layout.
- Use the rule of thirds or a grid to guide your arrangement, but feel free to center stylized food for symmetry.
- Use a tripod overhead to maintain consistency across multiple shots — helpful for batch content.
Angles for Product Shots
- Eye-level shot: Ideal for many products like bottles, jars, or accessories.
- 45-degree angle: Gives depth and reveals shape.
- Straight-on close-up / macro: Perfect for textures or fine detail.
- Sometimes include a hand or another object to show scale — helps viewers understand size.
Focus, Depth of Field & White Balance
- For accurate colors, use a white or grey card to set a custom white balance — crucial for product photography.
- Use manual focus or focus peaking (if available) to nail down sharpness, especially for macro or detail shots.
- Choose aperture based on your subject: a wide aperture (small f-number) gives shallow depth of field, while a mid-range aperture (f/5.6–f/8) gives more of your subject in focus.
Buying Used or Refurbished — Making Your Budget Stretch
To make the most of a sub-$500 budget, chances are good you’ll rely on the used or refurbished market. But you have to play smart.
Where to Buy Used Gear
- Trustworthy retailers: MPB, KEH, B&H Used, Adorama Used — these sellers rate used bodies, often include return windows, and often offer a limited warranty.
- Online Marketplaces: eBay or Facebook Marketplace can yield deals, but you’ll need to vet sellers carefully.
- Local camera shop: Sometimes they carry used bodies + lenses, and you can test before buying.
What to Watch for
- Shutter Count: Ask for it — it’s like mileage for a camera. A lower count indicates less use.
- Sensor / Body Condition: Ask for test shots, close-ups of the body, and information about scratches, fungus, or haze.
- Return Policy & Warranty: Buy from sellers who allow you to return (or at least test the camera) — refurbished gear with warranty is safer.
Minimizing Risk
- Pay securely (credit card, PayPal) where possible.
- Test the camera immediately when you receive it: check focus, test the shutter, take sample photos.
- Consider budgeting a few extra dollars for a professional cleaning or minor servicing — this can drastically improve performance.
Editing Workflow Without Breaking the Bank
Your images don’t just come alive in-camera — post-processing is a powerful step, and you don’t need expensive software to do it well.
Free or Low-Cost Editing Tools
- GIMP: It’s free, powerful, and supports layers and retouching.
- Darktable: Great for RAW file development and color correction — open-source and fully featured.
- Adobe Lightroom (Subscription): If you can stretch just a little, Lightroom is very efficient for batch editing, organizing, and refining photos.
Editing Tips for Food & Product Shots
- Start with Exposure & White Balance: Make sure your photo’s base is clean and accurate.
- Bring Out Texture: Use clarity, contrast, or texture sliders to emphasize details in food or product surfaces.
- Local Adjustments: Use brush or mask tools to brighten or darken certain areas — highlight textures, remove dust or glare.
- Sharpen Carefully: A little sharpening goes a long way; over-sharpening can produce unacceptable artifacts.
Export Best for Web or E-Commerce
- Use sRGB color space — that’s the standard for online images.
- Compress your images to an appropriate size (e.g., export at 80–90% JPEG) to balance quality and page load speed.
- Use descriptive file names (e.g.,
handmade-ceramic-mug-white.jpg) to help SEO and clarity for product listings.
A Real-World Case Study
To make this all feel more concrete, here’s a realistic example of someone using under-$500 gear to build a home studio for a micro business.
“Tiny Treats Bakery”
- Who: Maya, a 23-year-old home baker, selling cupcakes and cookies on Instagram and her website.
- What she bought: A used Sony a6000 body (~$430) + a used 50mm f/1.8 lens (~$70).
- Lighting: Two budget continuous LED panels + a foam board as a reflector (~$60 combined).
- Backdrop: White foam board for flat-lays, and a piece of brown craft paper for rustic product shots.
Shooting Process:
- For cupcakes, Maya uses an overhead tripod, positions lights on either side (angled in), and bounces soft fill from a board.
- For box sets or gift bundles, she uses a 45-degree angle setup with reflective foam board to highlight details.
Editing:
- She imports RAW into Darktable, corrects white balance with a grey card reference, tweaks clarity, and uses local brush adjustments on the frosting texture.
- Exports from Darktable to web-ready JPEGs at 85%, uploads to her Shopify / Instagram.
Results:
- Her product photos look professional and cohesive.
- Engagement on Instagram jumps, and she lands two monthly clients for custom orders.
- She reinvests part of her profit into a macro lens next.
Takeaway: With thoughtful gear choices, lighting, and technique — Maya built a strong visual brand for her business — all starting with gear under $500.
Challenges to Know & How to Overcome Them
Low Light / Noise:
Budget cameras may struggle at high ISO. The remedy? Use strong, consistent LED lighting to keep ISO low. In editing, shoot in RAW and apply noise reduction if needed.
Limited Lens Options:
Under $500, you might not have access to the newest or most premium lenses. Start with cheap primes or used macro lenses, then upgrade when income or savings allows.
Learning Curve:
Manual exposure, lighting, and composition take practice. The key is consistency: shoot often, test different setups, and review your work objectively. Use online tutorials or join local photo groups for feedback.
How to Scale Your Studio Over Time
Once you’ve established a foundation, here are ways to elevate your setup as your business or passion grows:
- Upgrade Your Camera Body When It Makes Sense
Only consider a new body when your current one is limiting your creative vision or workflow — not just because of specs. - Invest in Better Lenses
Put your next dollars into more specialized lenses: a high-quality macro, a fast prime, or a zoom that gives you flexibility for different product types. - Add Lighting & Studio Tools
Expand your lighting kit: softboxes, rim lights, or a light tent. Add more backdrops, or invest in props that reflect your brand style. - Refine Your Editing & Workflow
As you create more images, your editing process should become faster and more refined. Consider paid software when you need more professional-level control.
Marketing Your Studio Shots
Taking great photos is just one step — getting those images in front of customers is what powers your small business or creative brand.
- Social Media: Share styled flat-lays, behind-the-scenes setups, and finished product shots on Instagram, TikTok, or Pinterest. Use relevant hashtags like #productphotography, #foodphotography, or #smallbusiness.
- Use Your Photos to Build Trust: Use consistent, high-quality photos on your Etsy / Shopify / website. A clean product catalog with crisp images helps customers feel confident buying.
- Portfolio & Pricing: Build a simple portfolio (even just an Instagram grid or a web page) with your best 10–15 images. As you grow, you can offer your photography as a service: price based on shoot time + usage, and reinvest earnings into better gear.
Key Takeaways
- You can build a functional and professional-looking home photography studio for food or product shots using a camera under $500.
- Great budget options include the Sony a6000, Canon EOS R100, Panasonic G7, and Canon Rebel T7.
- Investing in the right lens — especially a macro or prime — amplifies your image quality more than upgrading the camera body.
- Consistent, well-placed LED lighting and DIY reflectors are powerful tools for studio photography.
- Buying used or refurbished helps you stretch your budget, but inspect carefully and track shutter count.
- Practice composition, manual focus, and exposure — your creativity is the real engine behind professional-looking images.
Conclusion
Starting a home photography studio for food or products doesn’t require a massive budget. With thoughtful gear choices — a best camera for home product photography under $500, paired with simple lighting and lenses — you can create stunning visuals that represent your brand well. As you grow, you can reinvest in better tools, but even this lean setup is more than capable of producing content that looks clean, polished, and professional.
It’s not about having the most expensive camera — it’s about how you use your resources, how well you light your shots, and how intentional you are with your work. Start small. Practice consistently. Scale thoughtfully. Your images will improve, your business will grow, and your passion will pay off.
Choose one of the recommended cameras, set up a simple test shoot in your space, and post your first product or food image on Instagram or your website. Tag #BudgetStudioMagic — I want to see what you create.
FAQs
Q1: Can I really use an under-$500 camera to sell products online?
Yes! With controlled studio lighting, a good lens, and solid editing, a budget camera can produce imagery that looks professional and helps you sell.
Q2: Is it better to buy used or new at this price point?
Buying used or refurbished is often more cost-effective — as long as you check shutter count, condition, and buy from trusted sellers.
Q3: Which lens should I start with for product photography on a budget?
A macro lens or a 50mm prime is a great entry point — both are usually available used and allow you to capture detail and blur backgrounds.
Q4: Do I need expensive flash gear, or will LEDs do?
LED lights are more than enough for starting a home studio. They’re affordable, easy to use, and let you see light on your subject in real time.
Q5: How do I make my small-business photography look consistent and polished?
Use consistent lighting, color balance (via white balance), and composition techniques. Practice, use similar backdrops, and edit your images in a coherent workflow.
Thanks for reading! If this guide helped you, share it with fellow creators or small business owners who want to take bett
er photos without breaking the bank. What’s the first product or food item you plan to photograph with your budget setup? I’d love to hear — leave a comment or tag me on Instagram!