
Table of Contents
- The Cluttered Composition: No Clear Focal Point
- Relying on Auto Mode Indefinitely
- Always Shooting Wide Open for Bokeh
- Ignoring the Background and Foreground
- Using the Wrong ISO and Dealing with Noise
- Blurry Images: Focus vs. Style
- Not Getting Close to Your Subject
- Poor Post-Processing and Editing Workflow
- Forgetting Essential Gear Preparation
- Letting Errors Discourage You
- Additional Tips for Consistent Improvement
- Common Beginner Photography Myths
- The Role of Lighting in Avoiding Mistakes
- Conclusion
- Frequently Asked Questions
Every photographer—from beginners to seasoned pros—has made mistakes. In fact, almost everyone has at some point. However, the good news is that recognizing and correcting these errors can dramatically accelerate your progress. By fixing small, correctable issues, you can gain control, confidence, and creativity behind the lens much faster than you might expect. Therefore, this guide will walk you through the ten most frequent photography mistakes and show you how to fix them effectively.
The Cluttered Composition: No Clear Focal Point
The Mistake: Often, photographers try to include too much in a single frame. As a result, the image becomes cluttered, and the viewer’s eye doesn’t know where to focus.
The Fix: First, simplify your scene. Identify your main subject before shooting. Then, use techniques like the rule of thirds, leading lines, or negative space to establish a visual hierarchy. By isolating your subject, you guide the viewer’s attention and create a stronger narrative. Moreover, this approach makes your photos more compelling and professional-looking.
Relying on Auto Mode Indefinitely
The Mistake: Staying in full Auto mode is convenient, but it limits creativity. Consequently, you lose control over exposure, aperture, shutter speed, and ISO.
The Fix: Instead, start using Aperture Priority (A/Av) or Shutter Priority (S/Tv). These semi-automatic modes allow you to control one creative aspect while the camera handles the rest. Therefore, they serve as a perfect bridge toward full manual control. Over time, you’ll understand how different settings affect your images, which gives you much more creative freedom.
Always Shooting Wide Open for Bokeh
The Mistake: Many photographers rely on their fast lenses to create blurred backgrounds, but most lenses are not at their sharpest when wide open.
The Fix: Discover your lens’s “sweet spot,” usually around f/5.6–f/8. Use wide apertures deliberately for subject isolation, but stop down when you want the entire scene to be sharp. Consequently, you’ll produce images that are both beautiful and crisp.
Ignoring the Background and Foreground
The Mistake: Focusing only on the subject often results in unwanted distractions appearing in the frame. For instance, a tree may look like it’s growing out of someone’s head.
The Fix: Always scan the entire frame, from foreground to background. Look for clutter, bright spots, or awkward objects. Often, a slight change in angle or moving a few steps can eliminate distractions. As a result, your photos will appear cleaner and more professional.
Using the Wrong ISO and Dealing with Noise
The Mistake: Using Auto ISO or keeping ISO too high introduces grain, while using too low an ISO in low light can force slow shutter speeds, leading to blur.
The Fix: Learn the exposure triangle: ISO, shutter speed, and aperture. In bright conditions, use a low ISO (100–400) for the cleanest results. Conversely, in low light, raise ISO to maintain a fast enough shutter speed to prevent blur. Ultimately, a slightly noisy image is preferable to one that is blurry.
Blurry Images: Focus vs. Style
The Mistake: Blurry photos are often defended as “artistic,” but most blur is accidental.
The Fix: First, master the technical aspects: autofocus modes, shutter speed, and camera stability. Once you have consistent sharpness, you can deliberately introduce blur for creative purposes. Therefore, knowing the difference between accident and art is essential.
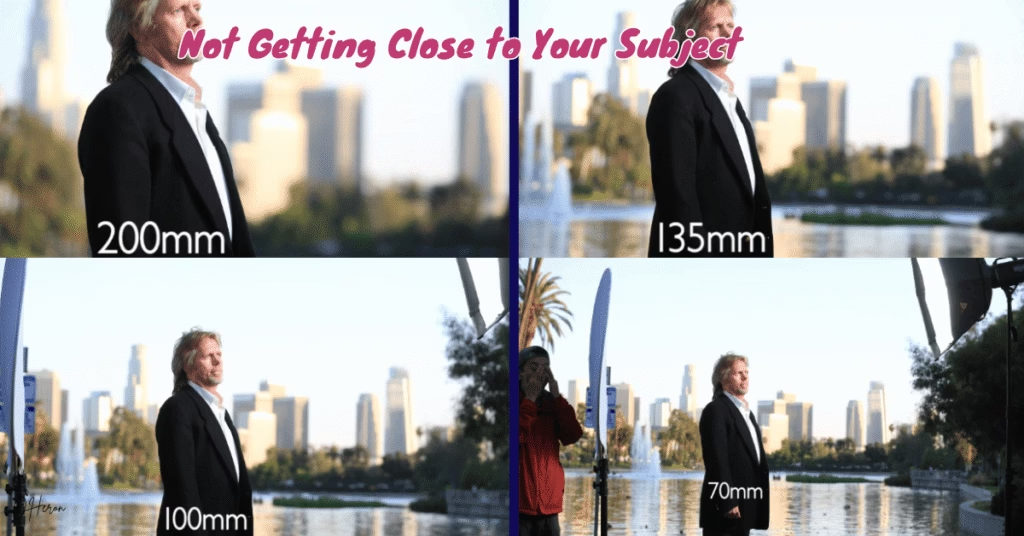
Not Getting Close to Your Subject
The Mistake: Standing too far away often makes your subject insignificant in the frame.
The Fix: Follow Robert Capa’s advice: get closer. Physically move toward your subject or zoom in. This technique fills the frame, emphasizes details, and removes distractions. Consequently, your photos become more engaging and impactful.
Poor Post-Processing and Editing Workflow
The Mistake: Either neglecting post-processing or over-editing can ruin your photos.
The Fix: Treat editing as a crucial part of photography. Adjust exposure, contrast, and white balance subtly. Moreover, develop a consistent editing style that enhances your images rather than transforming them unnaturally.
Forgetting Essential Gear Preparation
The Mistake: Dead batteries, full memory cards, or missing equipment can completely derail a shoot.
The Fix: Create a pre-shoot checklist. Charge extra batteries, format memory cards after backing up, and pack the right lenses and accessories. As a result, you’ll avoid frustrating setbacks and shoot more confidently.
Letting Errors Discourage You
The Mistake: Feeling disheartened when shots fail is the ultimate barrier to growth.
The Fix: Reframe mistakes as learning opportunities. Analyze failed images carefully: Was exposure off? Was the focus misplaced? Was the composition weak? By actively studying errors, you turn each failure into a stepping stone for improvement.
Additional Tips for Consistent Improvement
- Practice with purpose: Experiment, set goals, and shoot deliberately.
- Seek feedback: Join communities or share work with trusted peers for constructive critique.
- Reflect regularly: Review your shots to identify patterns and recurring mistakes.
Common Beginner Photography Myths
- Expensive gear guarantees better photos.
- Creativity is innate, not learned.
- Editing is cheating.
All of these myths can limit your growth. In reality, practice, knowledge, and critical observation outperform gear and talent every time.
The Role of Lighting in Avoiding Mistakes
Lighting dramatically affects image quality. Therefore, learning to use natural light, understanding shadows, and employing reflectors or artificial lighting is crucial. By controlling light, many common mistakes can be prevented before you even press the shutter.
Conclusion
Mistakes are inevitable, but they don’t have to hold you back. By addressing issues like composition, focus, ISO, and mindset, you can accelerate your growth and take stronger, more creative photos. Remember, every error is a lesson waiting to be learned. Practice deliberately, stay patient, and enjoy the journey behind the lens.
Frequently Asked Questions
Why are my photos often blurry and how can I fix this?
Blurry photos typically result from three main issues:
- Camera shake: Use a faster shutter speed (1/focal length or faster) or a tripod
- Incorrect focus: Use single-point autofocus and place it precisely on your subject
- Subject movement: Increase shutter speed to freeze action (1/250s or faster for moving subjects)
What’s the problem with shooting in Auto mode all the time?
While Auto mode is convenient, it prevents you from controlling depth of field, managing motion blur intentionally, and developing your creative vision.
Solution: Start with Aperture Priority (A/Av) mode to control depth of field.
How can I avoid cluttered, confusing compositions?
Cluttered compositions happen when you try to include too many elements. To simplify:
- Identify a clear subject before shooting
- Use the rule of thirds as a starting guide
- Get closer to your subject to eliminate distractions
- Create negative space around your subject
Why do my images look different from what I see with my eyes?
This common frustration stems from several factors:
- Dynamic range: Cameras can’t capture the same range of light and dark that our eyes see
- Focal length: Different lenses see the world differently than human vision
- Color interpretation: Cameras process color differently than our brain
What’s the best way to learn from my photography mistakes?
Effective learning involves a systematic approach:
- Review your images critically and analyze EXIF data
- Keep a photography journal of settings and conditions
- Seek constructive feedback from experienced photographers
- Practice intentionally, focusing on one skill at a time